Introduction
What is a Version Control System?
A Version Control System (VCS) is a tool for managing and tracking changes to our code. As we develop an application, we add features and fix bugs, continuously modifying our codebase. A VCS allows us to save “snapshots” at various stages of development, so we can always see what changed, when, and by whom.
The most well-known version control systems for source code are:
- Git
- Apache Subversion (SVN)
- Mercurial
- Bazaar
VCS Popularity
Having described what a VCS is, it is worth examining which of these has dominated over time. To answer this, we turn to historical search data from Google Trends, which tracks interest trends for popular terms.
The chart Figure 1 establishes Git as the dominant version control tool. Subversion (SVN) was more popular up until 2010, after which it entered a steady decline from which it never recovered. Today, Git is the de facto standard for source code management, and around it has grown a broad ecosystem of hosting platforms such as GitHub and GitLab.
Advantages
Why should I use such a tool?
- Easy rollback: If a change introduces a problem, we can revert to a previous, working version of the code with a single command.
- Time savings: Instead of manually hunting down what broke, Git tells us exactly what changed and when.
- Collaboration: It greatly simplifies working alongside other developers, especially through platforms like GitHub.
Disadvantages
Fair enough — but is there another side to this?
- One more tool to manage: Git adds a step to our workflow, making it slightly more complex at first.
- Learning curve: Getting comfortable with advanced features (branching, merging, rebasing) takes time. The basics, however, are quick to pick up.
Code Hosting
The tools we have described manage code locally, on our own machine. If we want to share our work or collaborate with others, we need a remote hosting service. The most widely used options are GitHub, GitLab, and Bitbucket.
If none of these suits us, we can host our code ourselves. Tools such as Gitea or its active fork, Forgejo, allow us to set up our own platform on a private server — essentially our own GitHub, free from third-party dependencies. Appealing as it sounds, self-hosting comes with significant operational complexity and distances us from the broader developer community.
Git Configuration
We have decided to try Git on a small project, or simply want to keep a version history of our work. Let us look at how to set it up properly from the start.
Setting a Name and Email
The first time we use Git, it will ask us to provide a name and an email address. Without these, it will not allow us to record any changes. This is because every snapshot we create is accompanied by the details of whoever made it.

Source: By LFAsia via Wikimedia Commons, 2018 — License: CC BY 3.0. View the original photo.
.jpeg)
Terminal
git config --global user.name "YourName"
git config --global user.email your_email
Note
If we plan to host our code on GitHub, it is worth hiding our personal email address. GitHub provides a noreply address for this purpose, so our real address is never exposed publicly. You can read more in the GitHub documentation.
Text Editor
Before we talk about the editor, it is worth explaining what a commit is. Every time we want to “save” the current state of our code, we create a commit. In essence, we are creating a snapshot that records exactly which files changed and how. Every commit must include a short message describing what we changed and why, so we can later understand the history of our project at a glance.
To write that message, Git automatically opens a text editor. On many systems (e.g. Ubuntu) the default is Vim. Vim is a powerful editor, but with a steep learning curve for someone encountering it for the first time. If we are not comfortable with it, we can switch to something more familiar.
Terminal
git config --global core.editor "editor_name"| Editor | Command |
|---|---|
| Visual Studio Code | git config --global core.editor "code --wait" |
| Atom | git config --global core.editor "atom --wait" |
| Nano | git config --global core.editor "nano" |
Visual Studio Code is currently the most popular editor according to the Stack Overflow Developer Survey, making it a safe choice if we do not have a strong preference.
Default Branch Name
A branch is an independent “line of development” of our code. Think of it as a parallel copy of our project, where we can experiment or develop a new feature without affecting the main codebase. Once we are satisfied with our changes, we can merge them back into the main branch. Every Git repository always starts with an initial branch, which was traditionally called master.
In October 2020, GitHub announced that it was changing the default name of this branch from master to main. This change was part of a broader conversation in the tech community about avoiding terminology with negative historical connotations (master/slave), and was gradually adopted by the majority of tools and platforms.
The default branch name for new repositories is now main.
GitHub.blog — October 1, 2020
It is good practice to make the same change locally, so our repositories stay consistent with what we push to GitHub and we avoid connection issues between the local and remote repository.
Terminal
git config --global init.defaultBranch mainMerge Strategy
One setting that is not strictly necessary but worth considering relates to how Git handles merges. Suppose we create a feature branch to develop a new feature. When we are done and want to bring our changes back into main, Git’s behaviour depends on whether main has received any new commits in the meantime.
The first case is a Fast-forward merge. If no new commits have been made to main since we created the feature branch, the history looks like this:
In this case, Git performs a fast-forward merge by default: instead of creating a new merge commit, it simply moves the main pointer forward to the tip of the feature branch.
The result is a “clean”, linear history — as though the separate branch never existed. This may look tidy, but we lose the information that the changes were developed on a separate branch.
The second case is a Merge commit (without fast-forward). If new commits have been made to main in the meantime, a fast-forward is not possible and Git automatically creates a new merge commit that joins the two branches:
Here M is the merge commit. The history clearly shows that a separate development branch existed, when it was created, and when it was merged — which is very useful when working in a team or when we want to track the evolution of our project.
The merge.ff false setting
By setting this option, we tell Git to always create a merge commit, even when a fast-forward would be possible (Case 1). This ensures that our branch history is always visible and consistent, regardless of when we decide to merge.
Terminal
git config --global merge.ff false
Note
Whether we prefer fast-forward or merge commits depends on the philosophy of the project. In large teams, merge commits are considered good practice because they preserve a complete decision history. In small personal projects, the linear history of fast-forward may be easier to read.
Pull Strategy
When working with a remote repository (e.g. on GitHub), we often want to “download” changes that others have made to the project. This is done with the git pull command. What we may not realise is that git pull does not simply download the changes — it simultaneously decides how to integrate them into our local copy.
From Git 2.27 onwards, if we have not explicitly defined this behaviour, Git displays a warning every time we run git pull. To avoid it, we simply need to declare our preferred strategy.
The two main options are:
| Strategy | Command | When to use it |
|---|---|---|
| Merge | pull.rebase false |
Safe choice for beginners — creates a merge commit |
| Rebase | pull.rebase true |
Keeps history linear, but requires more familiarity |
To illustrate the difference, let us assume that after a shared commit B, the remote repository received a new commit C, while we made a local commit D. The two histories have now diverged:
pull.rebase false — Merge commit
With this option, Git creates a new merge commit M that joins the two diverged histories. The history retains both “paths” as visible:
pull.rebase true — Rebase
With this option, Git “replays” our local commit D on top of C, as though we had written it after pulling the remote changes. The result is a clean, linear history with no merge commit:
For beginners, the merge strategy is the safer choice:
Terminal
git config --global pull.rebase false
Note
The difference between merge and rebase is a topic that deserves a dedicated discussion. For now, it is enough to know that both achieve the same end goal — getting others’ changes onto our machine — but in different ways. If we are just starting out with Git, the false (merge) option is the one we will encounter most often in guides and tutorials.
Automatic Commit Signing
When we push commits to GitHub, the platform has no way of verifying that the sender is actually who they claim to be. Anyone can write any name and email in the user.name/user.email settings. Signing commits with a cryptographic key solves this problem. GitHub verifies our identity and displays a green Verified badge next to each signed commit.
There are two ways to sign:
- GPG key — the traditional approach, more robust but also more involved to set up.
- SSH key — a simpler alternative supported by GitHub since 2022. If we already use SSH for authentication, the same key can also serve for signing.
Warning
If we do not yet have a GPG key, we can follow GitHub’s guide to generate one. We can then link it to our hosting platform:
Without any additional configuration, signing a commit requires the -S flag:
Terminal
git commit -S -m "message"This is easy to forget. For this reason, we can configure Git to sign every commit automatically:
Terminal
git config user.signingkey key_id
git config commit.gpgsign true
Reviewing the Configuration
Once we have completed the settings above, we can review them all at once with the following command:
Terminal
git config --list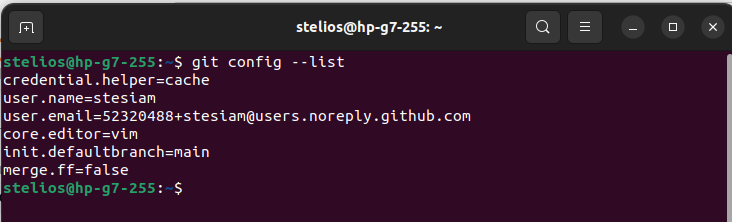
The output gives us a complete picture of our Git configuration. Every user has different needs, so if we want to explore further options, the official git-config documentation is the best starting point.
Summary
A quick reference of all the commands we used to configure Git:
Terminal
git config --global user.name "YourName"
git config --global user.email your_email
git config --global core.editor "editor_name"
git config --global init.defaultBranch main
git config --global merge.ff false
git config --global pull.rebase false

# Signing commits with a GPG key
gpg --list-secret-keys --keyid-format LONG
git config user.signingkey key_id
git config commit.gpgsign true

# Review all settings and their origin
git config --list --show-origin
All of these settings are stored in the .gitconfig file, located in our system’s home directory.
Warning
The .gitconfig file may not be immediately visible, as files beginning with a dot are hidden by default on Unix-based systems. If we cannot see it, we simply need to enable the display of hidden files in our file manager (on Ubuntu: Ctrl + H in Nautilus).
Acknowledgements
Photo by Daniel Skovran from Pixabay
References
Chacon, S., & Straub, B. (2014). Pro git. Springer Nature.
Citation
BibTeX citation:
@online{2022,
  author = {, stesiam},
  title = {Git {Configuration}},
  date = {2022-11-04},
  url = {https://stesiam.com/posts/git-commands/},
  langid = {en}
}
For attribution, please cite this work as:
stesiam. (2022, November 4). Git Configuration. Retrieved from https://stesiam.com/posts/git-commands/