Predict Possible Interested Clients

Build a classification machine learning model (using LightGBM & XGBoost) in order to classify people based on their interest to have a term deposit or not.

R
Classification
Tidymodels
Author

stesiam

Published

November 24, 2022

Introduction

On this article, I will make a ML model, in order to predict the costumers of a bank that are interested on having a term deposit. To achieve this goal I will use some Boosting algorithms (XGBoost and LightGBM). The data is from UCI website (Dua & Graff, 2017) and the dataset that I worked with is “Bank Marketing” (Moro, Cortez, & Rita, 2014).

But first let’s explain some things.

What is a term deposit ?

Generally, we are saving our money in a bank account but we are promising to not withdraw them for a specific amount of time.

And why someone to do that ?

It is apparent that term deposits have a major disadvantage over regular ones in terms of capital availability. Of course, people will not have motive to do that without anything in return. For that reason, the banks usually offer higher interest for that kind of accounts. For example, Piraeus Bank (a bank in Greece) offers double interest rate on term deposits compared to regular ones.

So, we can assume that there will be a serious interest for that product mostly on people with significant amount of savings (>1000) and do not have large, extraordinary expenses (loan, kids, etc.).

Prerequisites

Import libraries

For this analysis we will need standard libraries for importing and processing my data, such as readr (Wickham, Hester, & Bryan, 2022) and dplyr (Wickham, François, Henry, Müller, & Vaughan, 2023). The kableExtra (Zhu, 2021) package was used to print the results in table format. Concerning general purpose R libraries, I also used gridExtra in order to show ggplot items side to side.

On its basis this analysis is about to predict if someone is interested or not to have a term deposit. Thus, we need to build a ML model. The all-in-one solution package tidymodels is crucial to this. Although, there are some concerns about our data (imbalanced predicted value and our implementation of LightGBM. Thankfully, these are solved by bonsai and treesnip packages, respectively.

Finally, the ggplot2 (Wickham et al., 2024) package was used to create some visualizations, as well as an auxiliary package, ggtext (Wilke & Wiernik, 2022), for further formatting those.

Show the code
# General purpose R libraries
library(readr)
library(dplyr)
library(forcats)
library(kableExtra)
library(gridExtra)

# Build ML models
library(tidymodels)

# Graphs
library(ggplot2)
library(ggtext) # Add support for HTML/CSS on ggplot

# Other R packages
library(fontawesome)


# Build ML models

library(tidymodels)
library(bonsai)
library(themis)

# Other settings
options(digits=4) # print only 4 decimals
options(warn = -1)

Import dataset

After loading R libraries, then I will load my data. The initial source of my dataset has various versions of the same dataset. I will use the smaller one, as the fitting process on Boosting algorithms it is more time consuming in comparison with other methods (e.g. Logistic Regression, k-Nearest Neighbours etc.).

Show the code
bank_dataset <- read_delim("bank_dataset_files/bank.csv",  delim = ";", escape_double = FALSE, trim_ws = TRUE)

bank_dataset = bank_dataset %>% tibble::rowid_to_column("ID")

Preview dataset

Here we can see a small chunk of my dataset (first 10 rows / observations) just to understand the dataset’s structure and type of variables.

Show the code
#| label: tbl-preview-dataset
#| tbl-cap: "Preview Dataset (first 6 rows)"
#| 
preview_bank_dataset = head(bank_dataset, 10)
kbl(preview_bank_dataset, 
    align = 'c',
    booktabs = T,
    centering = T,
    valign = T) %>%
  kable_paper() %>%
  scroll_box(width = "600px", height = "250px")
ID age job marital education default balance housing loan contact day month duration campaign pdays previous poutcome y
1 30 unemployed married primary no 1787 no no cellular 19 oct 79 1 -1 0 unknown no
2 33 services married secondary no 4789 yes yes cellular 11 may 220 1 339 4 failure no
3 35 management single tertiary no 1350 yes no cellular 16 apr 185 1 330 1 failure no
4 30 management married tertiary no 1476 yes yes unknown 3 jun 199 4 -1 0 unknown no
5 59 blue-collar married secondary no 0 yes no unknown 5 may 226 1 -1 0 unknown no
6 35 management single tertiary no 747 no no cellular 23 feb 141 2 176 3 failure no
7 36 self-employed married tertiary no 307 yes no cellular 14 may 341 1 330 2 other no
8 39 technician married secondary no 147 yes no cellular 6 may 151 2 -1 0 unknown no
9 41 entrepreneur married tertiary no 221 yes no unknown 14 may 57 2 -1 0 unknown no
10 43 services married primary no -88 yes yes cellular 17 apr 313 1 147 2 failure no

Dataset structure

Before we do any analysis we have to define what kind of data we have available. We can assess this type of information by looking on the values of each variable. Generally, we can classify our variables, depending their values, as follows :

Show the code
graph TD;
  A(Type of variables) --> B(Quantitative)
  A(Type of variables) --> C(Qualitative)
  B --> D(Discrete)
  B --> E(Continuous)
  C --> J(Nominal)
  C --> G(Ordinal)

graph TD;
  A(Type of variables) --> B(Quantitative)
  A(Type of variables) --> C(Qualitative)
  B --> D(Discrete)
  B --> E(Continuous)
  C --> J(Nominal)
  C --> G(Ordinal)

Our dataset is consisted by 18 variables (columns) and 4521 observations (rows). More specifically, concerning my variables, are as follows :

Variable Property Description
Age quantitative
(continuous)
The age of the respondent
Job qualitative
(nominal)
The sector of employment of the respondent
Marital qualitative
(nominal)
The marital status of the respondent
Education qualitative
(ordinal)
The higher education level that the respondent has ever reached
Default qualitative
(nominal)
has credit in default?
Balance quantitative
(continuous)
Average yearly balance, in euros
Housing qualitative
(nominal)
Has housing loan?
Loan qualitative
(nominal)
Has personal loan?
Contact qualitative
(nominal)
Contact communication type
Month qualitative
(ordinal)
Last contact day of the month
Duration quantitative
(continuous)
Last contact duration, in seconds (numeric)
Campaign quantitative Number of contacts performed during this campaign and for this client
pdays quantitative Number of days that passed by after the client was last contacted from a previous campaign
pprevious quantitative Number of contacts performed before this campaign and for this client
poutcome qualitative (nominal) Outcome of the previous marketing campaign
Deposit qualitative
(nominal)
Has the client subscribed a term deposit?

Thus, my sample has 18 variables, of which 7 are quantitative and 10 are quantitative properties, of which 8 are nominal and the rest ones (Education, Month) are ordinal.

Show the code
bank_dataset$y = as.factor(bank_dataset$y)

Custom functions

So, I have a basic idea about my data. Can we start analyzing our data?

It depends. If you want to do a simple analysis then yes. Although most of the times this is not the case. Probably there is the need for repetitive actions. In order to not repeat ourselves we need to define some actions, prior to our analysis.

On this occasion, I found beneficial the definition of a function for qualitative data.

Show the code
univariate_qualitative = function(variable, title_plot){
table = bank_dataset %>%
    select(variable) %>%
    table() %>%
    prop.table() %>%
    as.data.frame() %>%
    magrittr::set_colnames(c("Var1", "Freq"))
  
plot =  ggplot(data = table, aes(x = fct_reorder(Var1,Freq, .desc = T), fill=Var1, y = Freq)) + 
     geom_bar(stat = "identity")+
     scale_fill_hue(c = 40) +
     geom_text(aes(label = sprintf("%.2f %%", Freq*100),  stat="identity",
        vjust = -.1)) +
     labs(
       title = title_plot,
       caption = "Bank Marketing Dataset from <b>UCI</b>",
       x = "Response",
       y = "Observations"
        ) +
     theme_classic() +
     theme(legend.position = "none",
        axis.text.x = element_text(angle = 30, vjust = 0.5),
        plot.caption = element_markdown(lineheight = 1.2),
        plot.title = element_text(hjust = 0.5),)
  
return(plot)
}

I will do the same for univariate numeric data.

Show the code
univ_quanti = function(variable_sel){
  ggplot(bank_dataset, aes(x = variable_sel )) +
  geom_histogram(x = variable_sel, stat = "count") +
  scale_fill_hue(c = 40) +
  labs(
    title = "Age Distribution of Respondents",
    caption = "Bank Marketing Dataset from <b>UCI</b>",
    x = "Age of Respondent",
    y = "Observations"
  ) +
  theme_classic() + 
  theme(
    plot.caption = element_markdown(lineheight = 1.2),
    plot.title = element_text(hjust = 0.5))
}

EDA with R

Missing Values

Show the code
how_many_nas = sum(is.na(bank_dataset))

On this dataset there are 0 missing values, in total. So, there is no need for imputation.

Univariate analysis

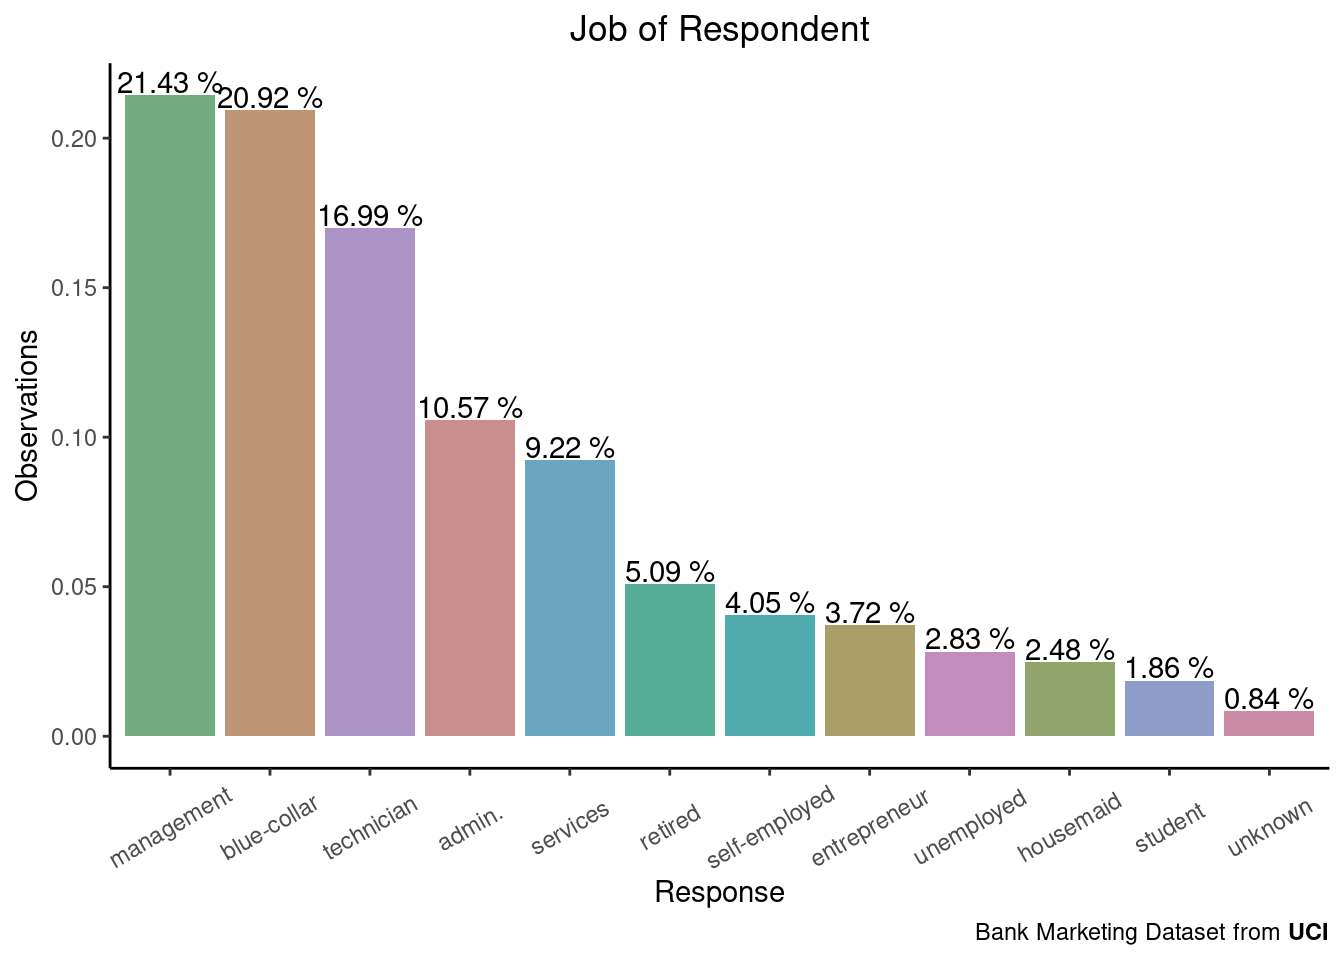
Qualitative variables

Show the code
univariate_qualitative("job", "Job of Respondent")

Show the code
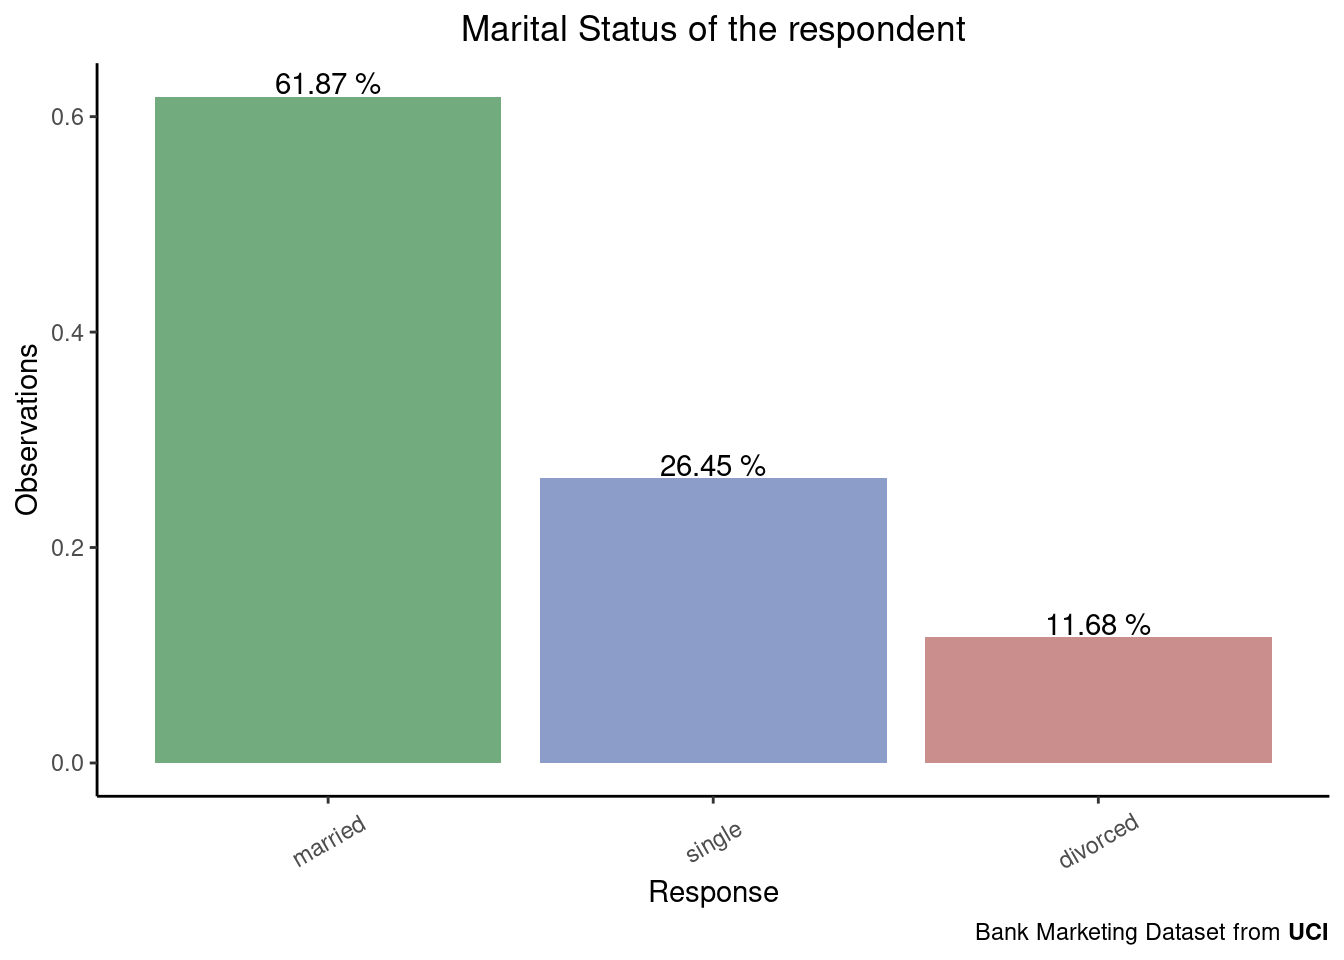
univariate_qualitative("marital", "Marital Status of the respondent")

Show the code
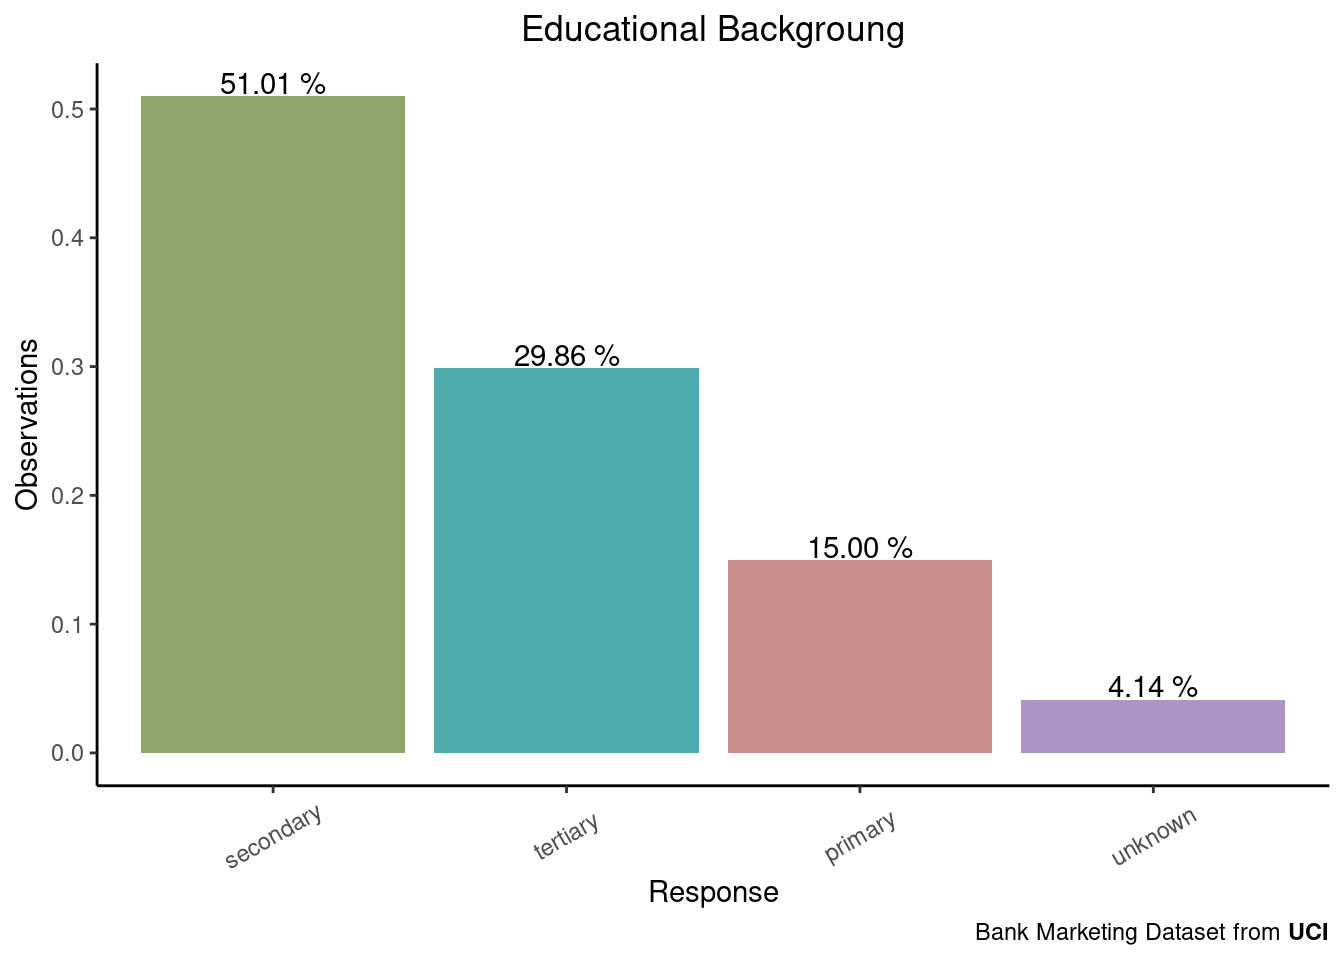
univariate_qualitative("education", "Educational Backgroung")

Show the code
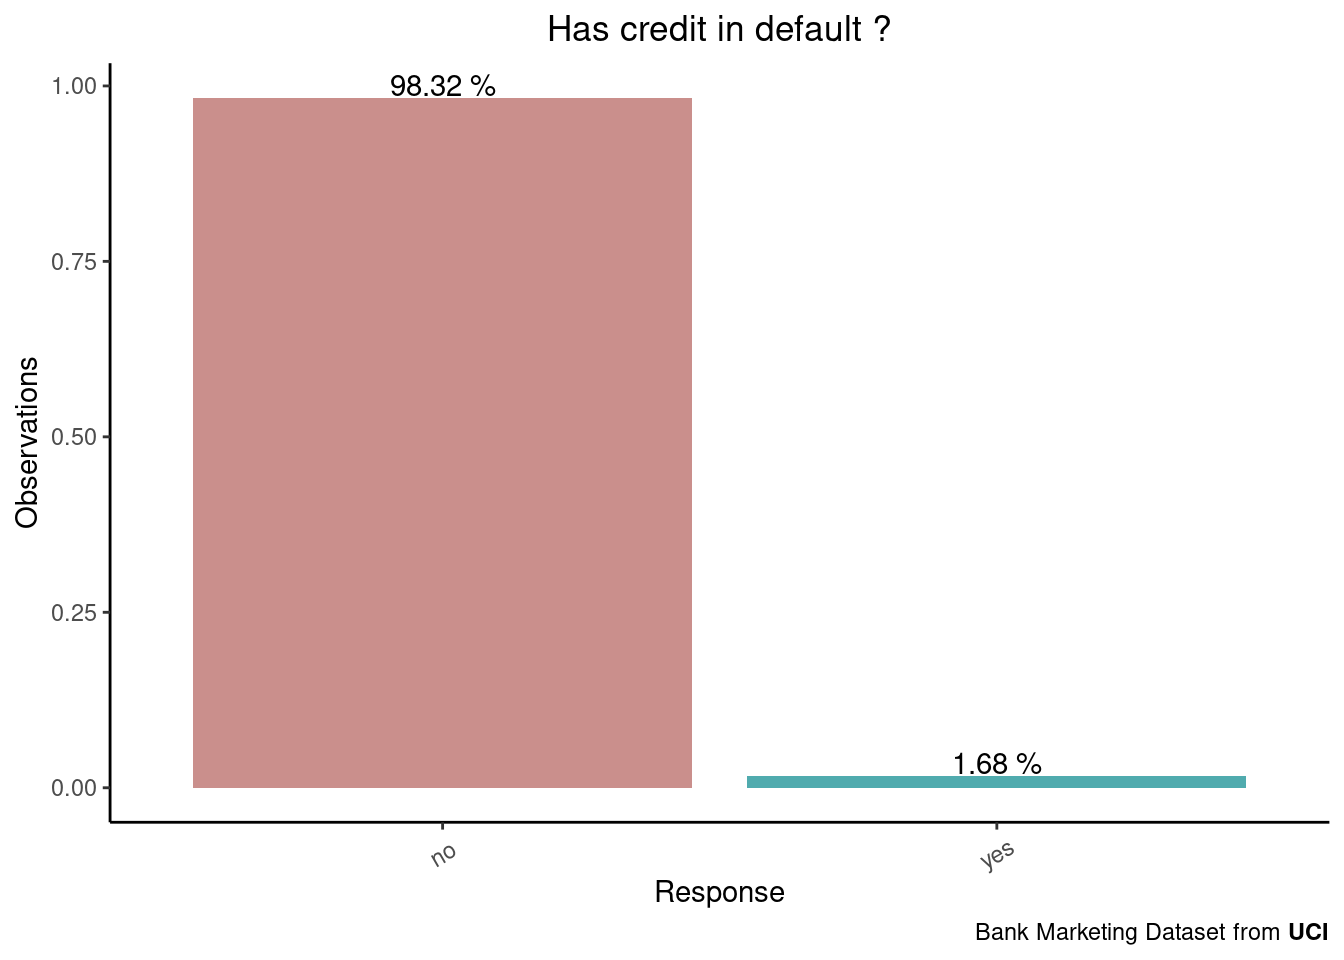
univariate_qualitative("default", "Has credit in default ?")

Show the code
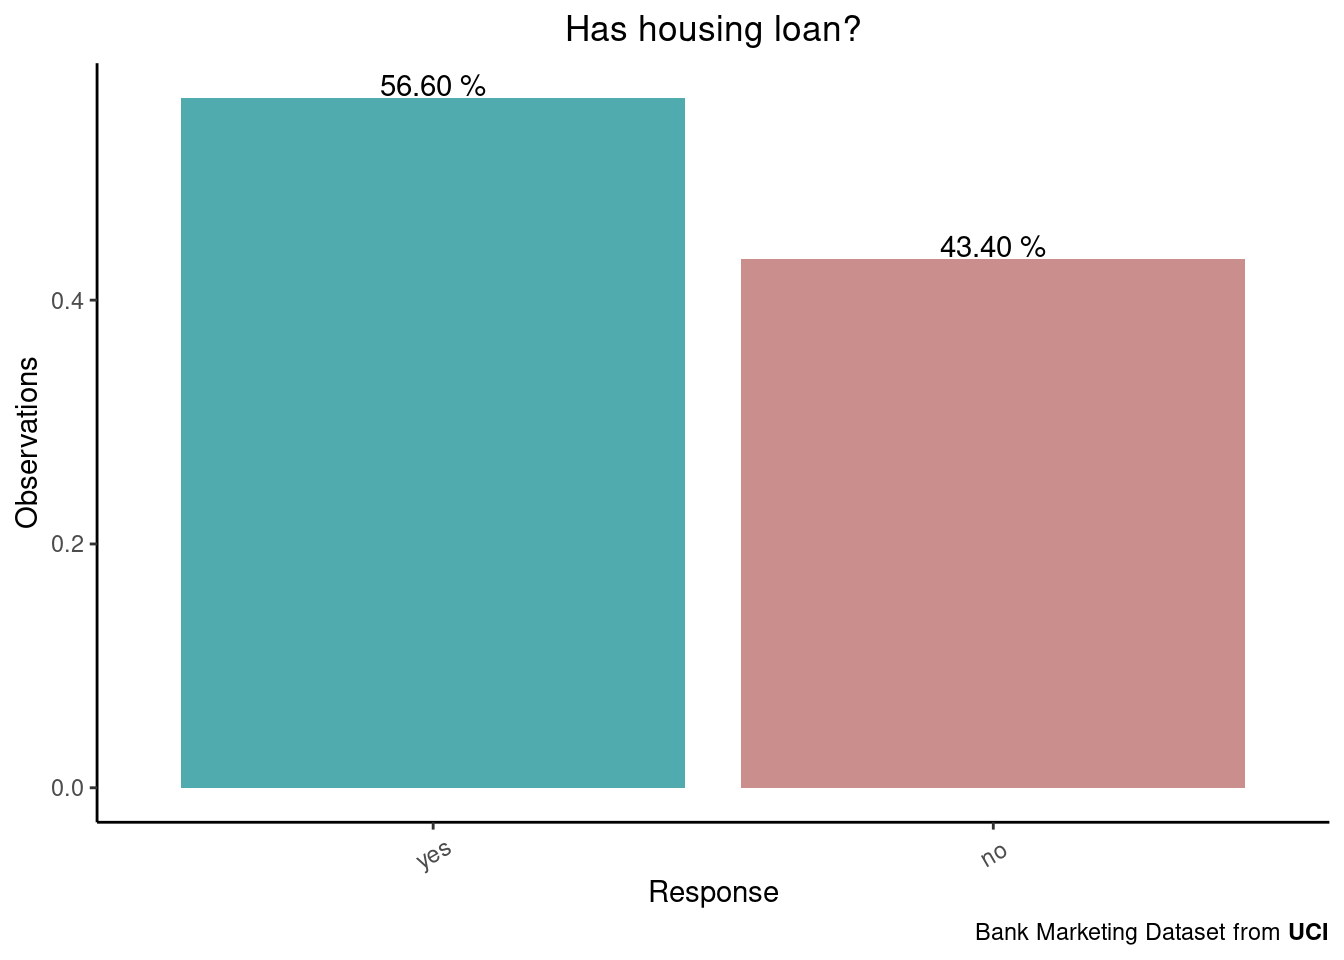
univariate_qualitative("housing", "Has housing loan?")

Show the code
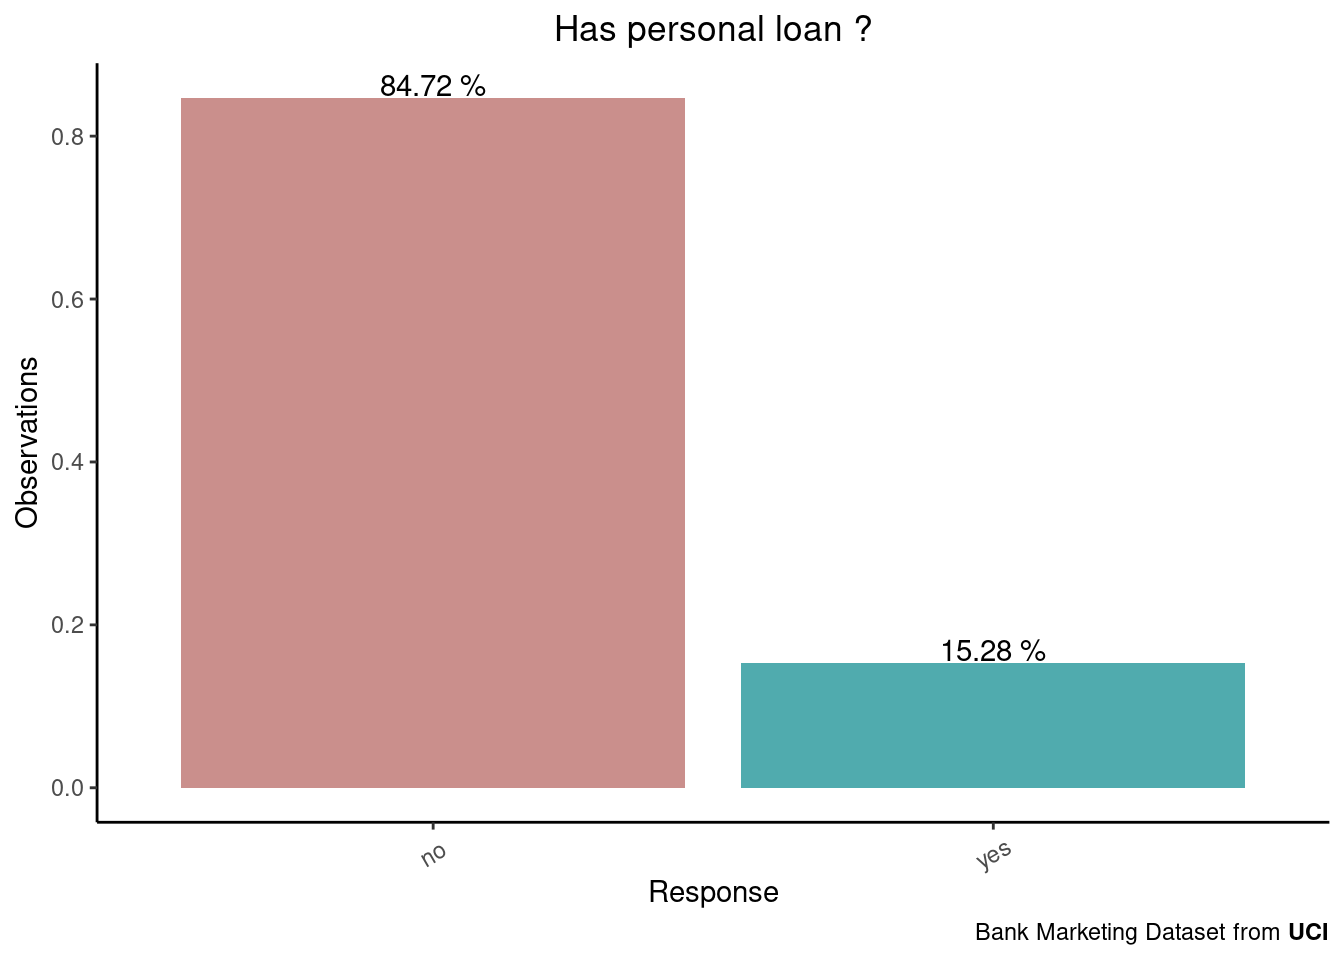
univariate_qualitative("loan", "Has personal loan ?")

Show the code
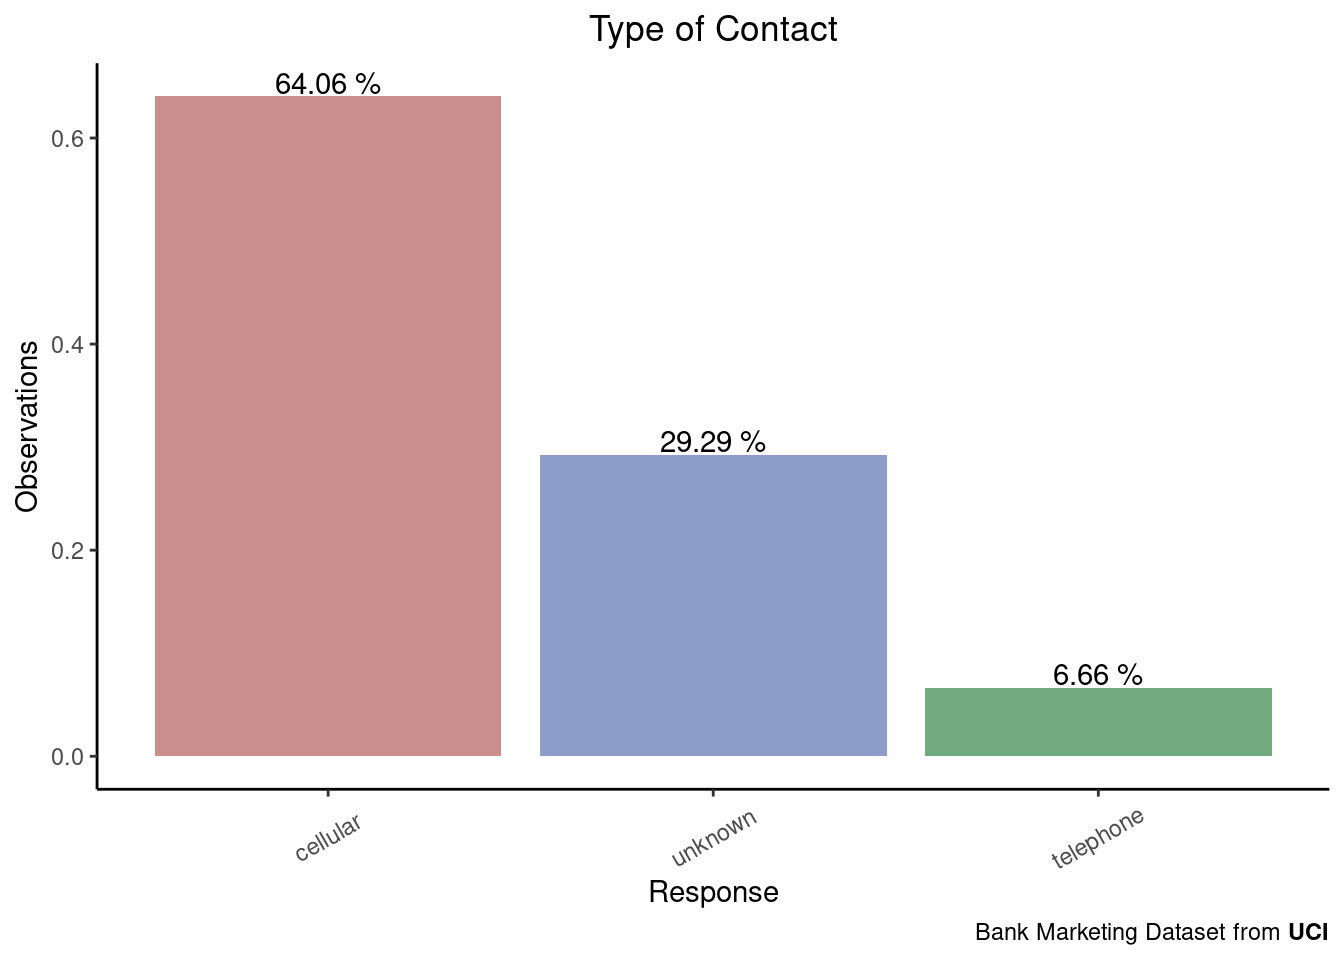
univariate_qualitative("contact", "Type of Contact")

Show the code
options(digits =2)

perc_month = table(bank_dataset$month) %>%
  prop.table() %>%
  sort(decreasing = T) %>%
  as.data.frame()

num_month = table(bank_dataset$month) %>%
  sort(decreasing = T) %>%
  as.data.frame()

perc_month %>%
    ggplot(aes(x = factor(Var1, level = c('jan', 'feb', 'mar', 'apr','may','jun','jul','aug','sep', 'oct', 'nov', 'dec')), y = Freq)) + 
  geom_bar(stat = "identity")+
  scale_fill_hue(c = 40) +
  geom_text(aes(label = sprintf("%.2f", Freq*100),  stat="identity",
        vjust = -.25)) +
  labs(
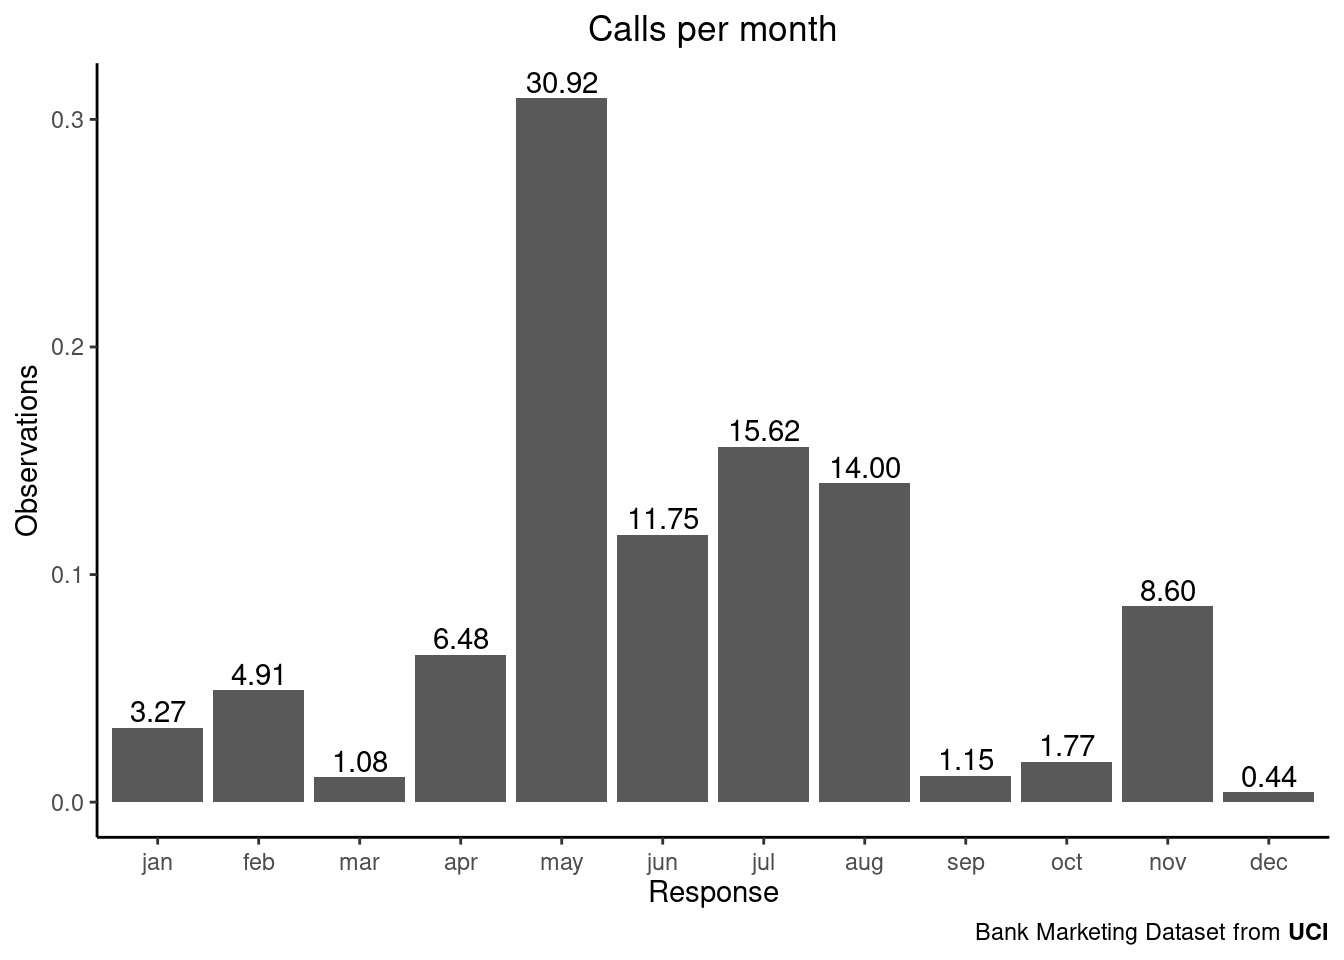
    title = "Calls per month",
    caption = "Bank Marketing Dataset from <b>UCI</b>",
    x = "Response",
    y = "Observations"
  ) +
  theme_classic() +
  theme(legend.position = "none",
        axis.text.x = element_text(vjust = 0.5),
        plot.caption = element_markdown(lineheight = 1.2),
        plot.title = element_text(hjust = 0.5))

Show the code
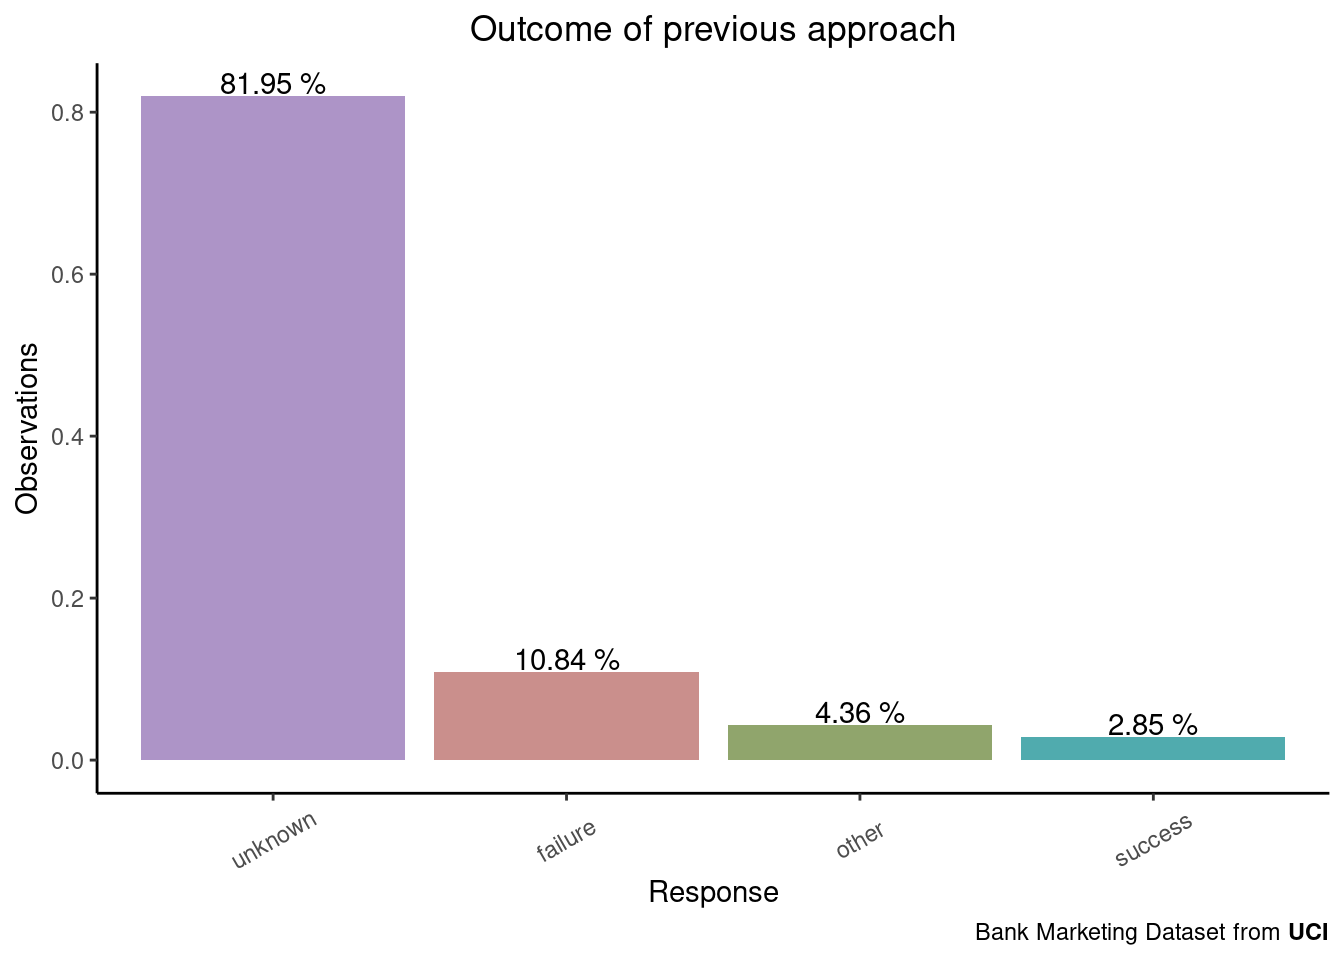
univariate_qualitative("poutcome", "Outcome of previous approach")

Show the code
univariate_qualitative("y", "How many people made a deposit account ?")

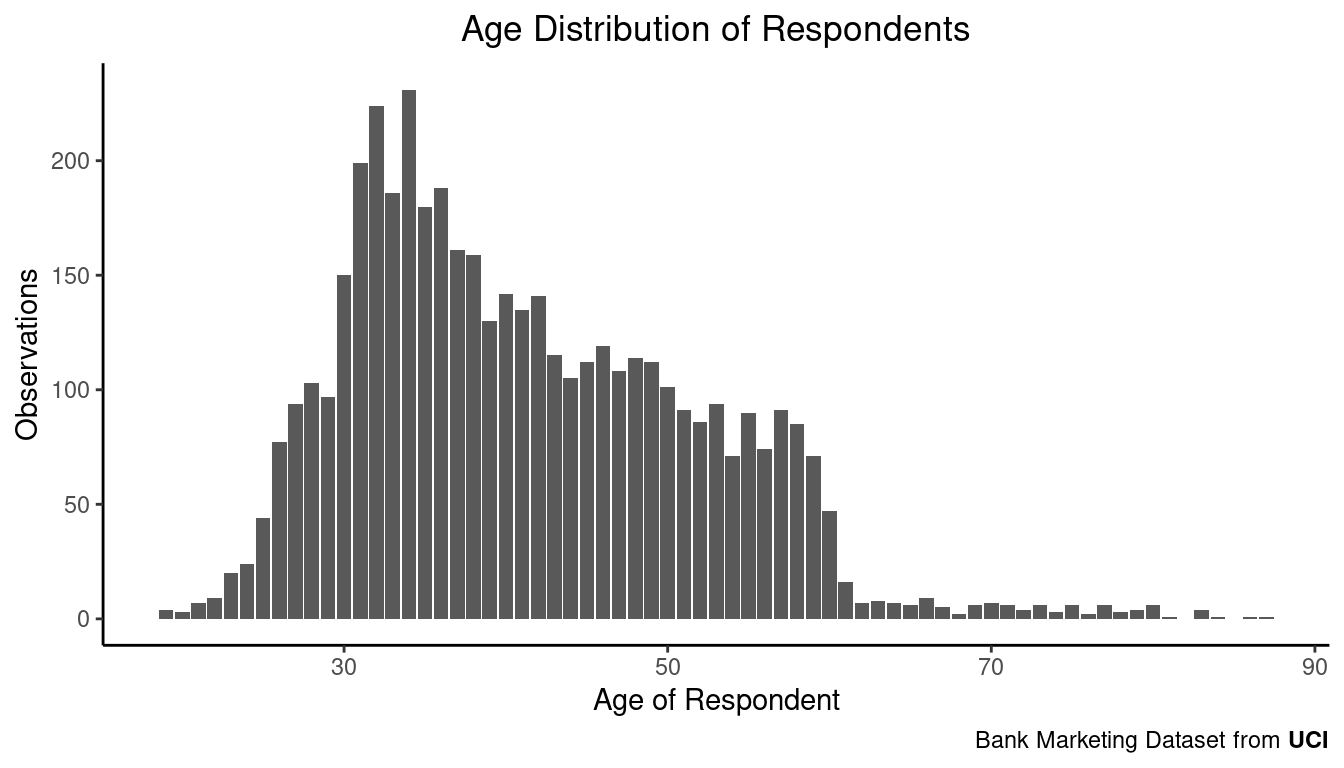
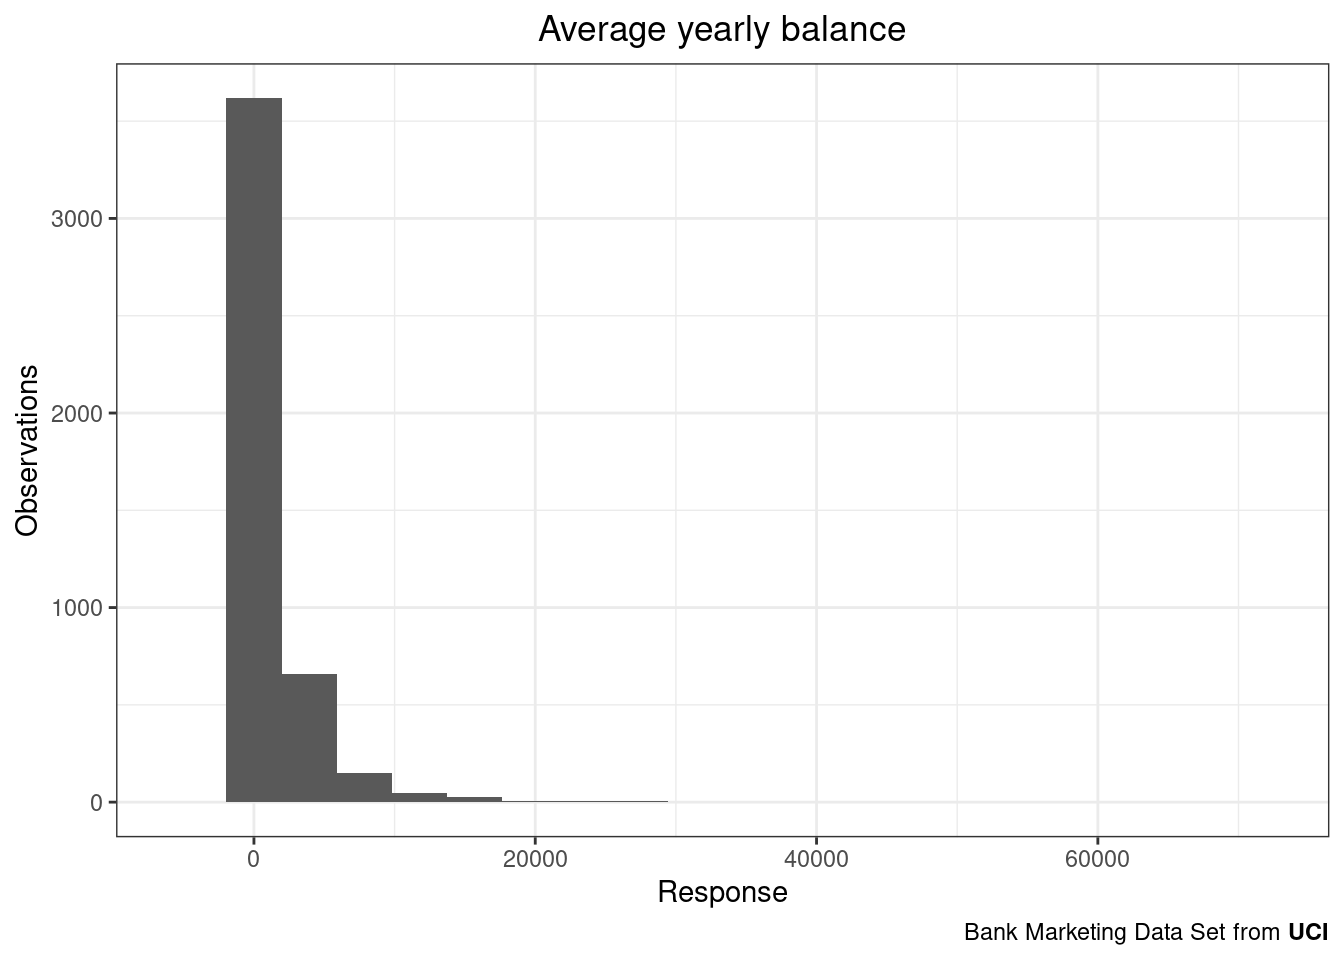
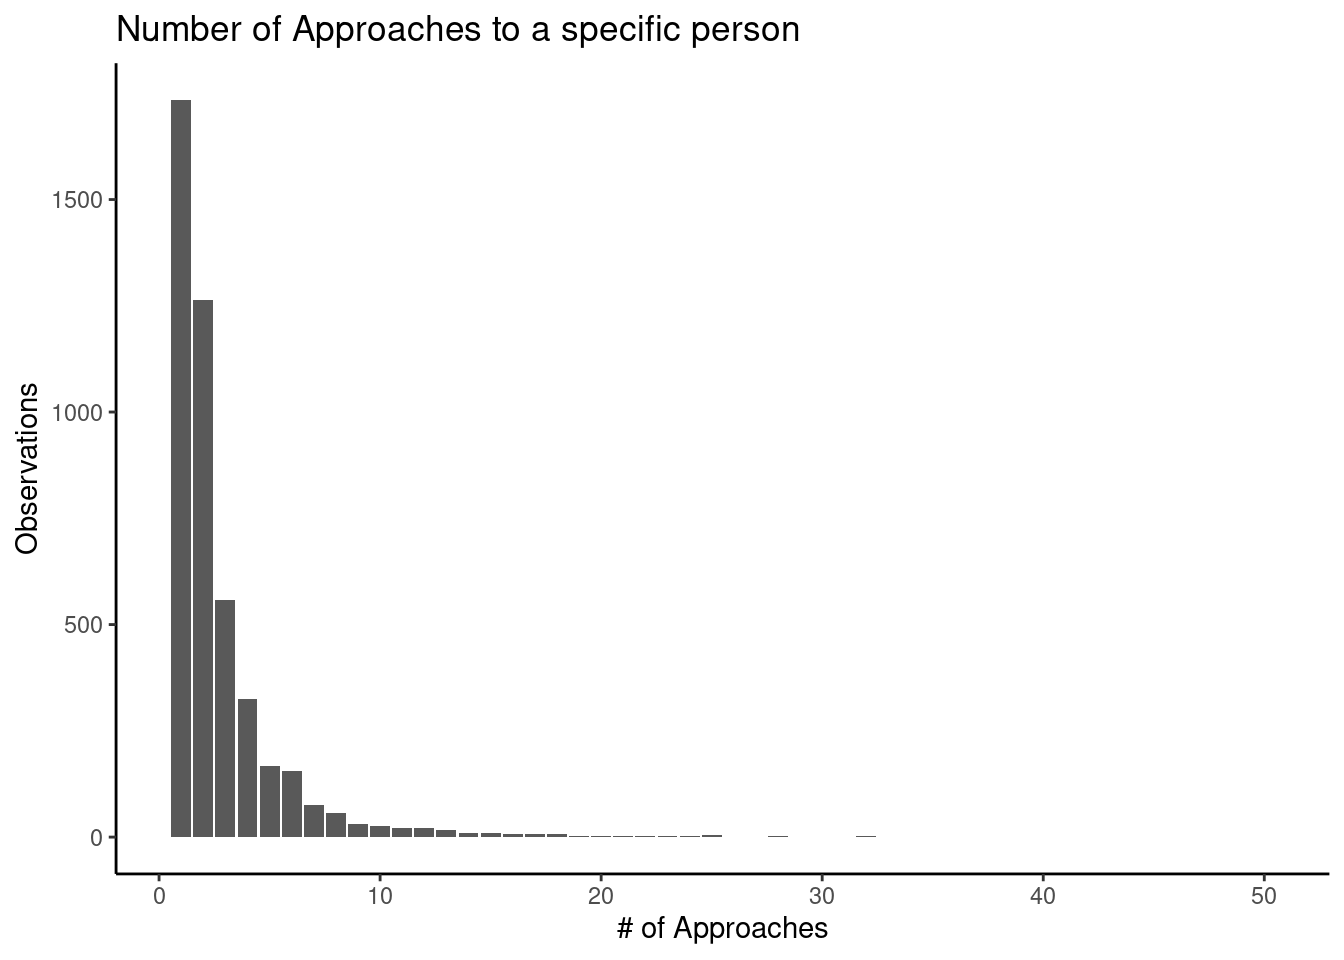
Quantitative variables

Show the code
ggplot(bank_dataset, aes(x = age )) +
  geom_bar() +
  scale_fill_hue(c = 40) +
  labs(
    title = "Age Distribution of Respondents",
    caption = "Bank Marketing Dataset from <b>UCI</b>",
    x = "Age of Respondent",
    y = "Observations"
  ) +
  theme_classic() + 
  theme(
    plot.caption = element_markdown(lineheight = 1.2),
    plot.title = element_text(hjust = 0.5))

Show the code
# NOTE : In order to make HTML tags to work I need to specify element on theme command.
Show the code
ggplot(bank_dataset, aes(x=balance)) + 
  geom_histogram(bins = 20) +
  scale_fill_hue(c = 40) +
  labs(
    title = "Average yearly balance",
    caption = " Bank Marketing Data Set from <b>UCI</b>",
    x = "Response",
    y = "Observations"
  ) +
  theme_bw() +
  theme(legend.position = "none",
        plot.caption = element_markdown(lineheight = 1.2),
        plot.title = element_text(hjust = 0.5))

Show the code
ggplot(bank_dataset, aes(x=duration, fill=duration)) + 
  geom_histogram( ) +
  scale_fill_hue(c = 40) +
  theme_bw() +
  labs(
    title = "How many people made a deposit account ?",
    caption = "Data from the 1974 Motor Trend US magazine.",
    x = "Response",
    y = "Observations"
  ) +
  theme_classic() +
  theme(legend.position = "none")
`stat_bin()` using `bins = 30`. Pick better value with `binwidth`.

Show the code
ggplot(bank_dataset, aes(x= campaign, fill=campaign )) + 
  geom_bar() +
  scale_fill_hue(c = 40) +
  theme_bw() +
  labs(
    title = "Number of Approaches to a specific person",
    x = "# of Approaches",
    y = "Observations"
  ) + 
  theme_classic()

Bivariate analysis

On the previous section I learned a lot about my dataset. Now, I have to reveal relationships between my variables. Visualizing those relationships will make it even easier to explain our results. In order to make the right plots on the right occasions I used the book “Datavis with R” (Chapter 4 : Bivariate Graphs).

Qualitative variables

Show the code
plotjob <- bank_dataset %>%
  group_by(job, y) %>%
  summarize(n = n()) %>% 
  mutate(pct = n/sum(n),
         lbl = scales::percent(pct))

plot_job = ggplot(plotjob, 
       aes(x = fct_reorder(job, pct),
           y = pct,
           fill = y)) + 
  geom_bar(stat = "identity",
           position = "fill") +
  geom_text(aes(label = lbl), 
            size = 3, 
            position = position_stack(vjust = 0.5)) +
  scale_fill_brewer(palette = "Set2") +
  labs(y = "Percent", 
       fill = "Drive Train",
       x = "Class",
       title = "Job of Respondent by Interest to Term Deposit") +
  theme_classic() +
  theme(legend.position = "none",
        axis.text.x = element_text(angle = 30, vjust = 0.5),
        plot.caption = element_markdown(lineheight = 1.2),
        plot.title = element_text(hjust = 0.5))

plot_job

Show the code
plot_marital1 <- ggplot(bank_dataset, 
       aes(x = marital, 
           fill = y)) + 
       scale_fill_hue(c = 40) +
       theme_bw() +
       geom_bar(position = position_dodge(preserve = "single"))
Show the code
plotmarital <- bank_dataset %>%
  group_by(marital, y) %>%
  summarize(n = n()) %>% 
  mutate(pct = n/sum(n),
         lbl = scales::percent(pct))

plot_marital2 = ggplot(plotmarital, 
       aes(x = marital,
           y = pct,
           fill = y)) + 
  geom_bar(stat = "identity",
           position = "fill") +
  geom_text(aes(label = lbl), 
            size = 3, 
            position = position_stack(vjust = 0.5)) +
  scale_fill_brewer(palette = "Set2") +
  labs(y = "Percent", 
       fill = "Drive Train",
       x = "Class",
       title = "Marital Status by Interest to Term Deposit") +
  theme_classic() +
  theme(legend.position = "none",
        axis.text.x = element_text(angle = 30, vjust = 0.5),
        plot.caption = element_markdown(lineheight = 1.2),
        plot.title = element_text(hjust = 0.5))
Show the code
gridExtra::grid.arrange(plot_marital1, plot_marital2, nrow =1)

Show the code
plot_education1 <- ggplot(bank_dataset, 
       aes(x = education, 
           fill = y)) + 
       scale_fill_hue(c = 40) +
       theme_bw() +
       geom_bar(position = position_dodge(preserve = "single"))
Show the code
plot_education2 = bank_dataset %>%
  group_by(education, y) %>%
  summarize(n = n()) %>% 
  mutate(pct = n/sum(n),
         lbl = scales::percent(pct)) %>%
    ggplot(aes(x = education,
           y = pct,
           fill = y)) + 
  geom_bar(stat = "identity",
           position = "fill") +
  geom_text(aes(label = lbl), 
            size = 3, 
            position = position_stack(vjust = 0.5)) +
  scale_fill_brewer(palette = "Set2") +
  labs(y = "Percent", 
       fill = "Drive Train",
       x = "Class",
       title = "Educational Background by Interest to Term Deposit") +
  theme_classic() +
  theme(legend.position = "none",
        axis.text.x = element_text(angle = 30, vjust = 0.5),
        plot.caption = element_markdown(lineheight = 1.2),
        plot.title = element_text(hjust = 0.5))
Show the code
gridExtra::grid.arrange(plot_education1, plot_education2, nrow =1)

Show the code
plot_default1 <- ggplot(bank_dataset, 
       aes(x = default, 
           fill = y)) + 
        scale_fill_hue(c = 40) +
        theme_bw() +
  geom_bar(position = position_dodge(preserve = "single"))
Show the code
plot_default2 = bank_dataset %>%
  group_by(default, y) %>%
  summarize(n = n()) %>% 
  mutate(pct = n/sum(n),
         lbl = scales::percent(pct)) %>%
    ggplot(aes(x = default,
           y = pct,
           fill = y)) + 
  geom_bar(stat = "identity",
           position = "fill") +
  geom_text(aes(label = lbl), 
            size = 3, 
            position = position_stack(vjust = 0.5)) +
  scale_fill_brewer(palette = "Set2") +
  labs(y = "Percent", 
       fill = "Drive Train",
       x = "Class",
       title = "Has credit in default ?") +
  theme_classic() +
  theme(legend.position = "none",
        axis.text.x = element_text(angle = 30, vjust = 0.5),
        plot.caption = element_markdown(lineheight = 1.2),
        plot.title = element_text(hjust = 0.5))
`summarise()` has grouped output by 'default'. You can override using the
`.groups` argument.
Show the code
gridExtra::grid.arrange(plot_default1, plot_default2, nrow =1)

Show the code
plot_housing1 <- ggplot(bank_dataset, 
       aes(x = housing, 
           fill = y)) + 
       scale_fill_hue(c = 40) +
       theme_bw() +
  geom_bar(position = position_dodge(preserve = "single"))
Show the code
plot_housing2 = bank_dataset %>%
  group_by(housing, y) %>%
  summarize(n = n()) %>% 
  mutate(pct = n/sum(n),
         lbl = scales::percent(pct)) %>%
    ggplot(aes(x = housing,
           y = pct,
           fill = y)) + 
  geom_bar(stat = "identity",
           position = "fill") +
  geom_text(aes(label = lbl), 
            size = 3, 
            position = position_stack(vjust = 0.5)) +
  scale_fill_brewer(palette = "Set2") +
  labs(y = "Percent", 
       fill = "Drive Train",
       x = "Class",
       title = "Has housing loan ?") +
  theme_classic() +
  theme(legend.position = "none",
        axis.text.x = element_text(angle = 30, vjust = 0.5),
        plot.caption = element_markdown(lineheight = 1.2),
        plot.title = element_text(hjust = 0.5))
`summarise()` has grouped output by 'housing'. You can override using the
`.groups` argument.
Show the code
gridExtra::grid.arrange(plot_housing1, plot_housing2, nrow =1)

Show the code
plot_loan1 <- ggplot(bank_dataset, 
       aes(x = loan, 
           fill = y)) + 
      scale_fill_hue(c = 40) +
      theme_bw() +
      geom_bar(position = position_dodge(preserve = "single"))
Show the code
plot_loan2 = bank_dataset %>%
  group_by(loan, y) %>%
  summarize(n = n()) %>% 
  mutate(pct = n/sum(n),
         lbl = scales::percent(pct)) %>%
    ggplot(aes(x = loan,
           y = pct,
           fill = y)) + 
  geom_bar(stat = "identity",
           position = "fill") +
  geom_text(aes(label = lbl), 
            size = 3, 
            position = position_stack(vjust = 0.5)) +
  scale_fill_brewer(palette = "Set2") +
  labs(y = "Percent", 
       fill = "Interested",
       x = "Class",
       title = "Has personal loan ?") +
  theme_classic() +
  theme(legend.position = "none",
        axis.text.x = element_text(angle = 30, vjust = 0.5),
        plot.caption = element_markdown(lineheight = 1.2),
        plot.title = element_text(hjust = 0.5))
`summarise()` has grouped output by 'loan'. You can override using the
`.groups` argument.
Show the code
gridExtra::grid.arrange(plot_loan1, plot_loan2, nrow =1)

Show the code
plot_contact1 <- ggplot(bank_dataset, 
       aes(x = contact, 
           fill = y)) + 
        scale_fill_hue(c = 40) +
        theme_bw() +
  geom_bar(position = position_dodge(preserve = "single"))
Show the code
plot_contact2 = bank_dataset %>%
  group_by(contact, y) %>%
  summarize(n = n()) %>% 
  mutate(pct = n/sum(n),
         lbl = scales::percent(pct)) %>%
    ggplot(aes(x = contact,
           y = pct,
           fill = y)) + 
  geom_bar(stat = "identity",
           position = "fill") +
  geom_text(aes(label = lbl), 
            size = 3, 
            position = position_stack(vjust = 0.5)) +
  scale_fill_brewer(palette = "Set2") +
  labs(y = "Percent", 
       fill = "Interested",
       x = "Class",
       title = "Forms of contact") +
  theme_classic() +
  theme(legend.position = "none",
        axis.text.x = element_text(angle = 30, vjust = 0.5),
        plot.caption = element_markdown(lineheight = 1.2),
        plot.title = element_text(hjust = 0.5))
`summarise()` has grouped output by 'contact'. You can override using the
`.groups` argument.
Show the code
gridExtra::grid.arrange(plot_contact1, plot_contact2, nrow =1)

Show the code
plot_month1 <- ggplot(bank_dataset, 
       aes(x = factor(month, level = c('jan', 'feb', 'mar', 'apr','may','jun','jul','aug','sep', 'oct', 'nov', 'dec')), 
           fill = y)) + 
       scale_fill_hue(c = 40) +
       theme_bw() +
  geom_bar(position = position_dodge(preserve = "single"))
Show the code
plot_month2 <- ggplot(bank_dataset, 
       aes(x = factor(month, level = c('jan', 'feb', 'mar', 'apr','may','jun','jul','aug','sep', 'oct', 'nov', 'dec')), fill = y)) + 
       geom_bar(position = "fill") +
  scale_fill_brewer(palette = "Set2") +
  theme_minimal()
Show the code
gridExtra::grid.arrange(plot_month1, plot_month2, nrow =1)

Show the code
plot_poutcome1 <- ggplot(bank_dataset, 
       aes(x = poutcome, 
           fill = y)) + 
       scale_fill_hue(c = 40) +
       theme_bw() +
  geom_bar(position = position_dodge(preserve = "single"))
Show the code
plot_poutcome2 = bank_dataset %>%
  group_by(poutcome, y) %>%
  summarize(n = n()) %>% 
  mutate(pct = n/sum(n),
         lbl = scales::percent(pct)) %>%
   ggplot(aes(x = poutcome,
           y = pct,
           fill = y)) + 
  geom_bar(stat = "identity",
           position = "fill") +
  geom_text(aes(label = lbl), 
            size = 3, 
            position = position_stack(vjust = 0.5)) +
  scale_fill_brewer(palette = "Set2") +
  labs(y = "Percent", 
       fill = "Interested",
       x = "Class",
       title = "Previous Campaign outcome") +
  theme_classic() +
  theme(legend.position = "none",
        axis.text.x = element_text(angle = 30, vjust = 0.5),
        plot.caption = element_markdown(lineheight = 1.2),
        plot.title = element_text(hjust = 0.5))
Show the code
gridExtra::grid.arrange(plot_poutcome1, plot_poutcome2, nrow =1)

Quantitative variables

Show the code
bank_dataset %>%
ggplot(aes(x=y, y=age, fill=y)) +
  geom_boxplot() +
  scale_fill_hue(c = 40) +
  theme_classic() +
  labs(
     title = "Age & Desire of Bank Deposit Account" 
  )

Show the code
plot1 = bank_dataset[bank_dataset$balance < 15000, ] %>%
ggplot(aes(x = balance, 
           fill = y)) + 
        scale_fill_hue(c = 40) +
        theme_bw() +
  geom_histogram(bins=15)

plot1

Show the code
ggplot(bank_dataset, 
       aes(x = duration, 
           fill = y)) + 
       scale_fill_hue(c = 40) +
       theme_bw() +
  geom_histogram()
`stat_bin()` using `bins = 30`. Pick better value with `binwidth`.

Show the code
ggplot(bank_dataset, 
       aes(x = campaign, 
           fill = y)) + 
       scale_fill_hue(c = 40) +
       theme_bw() +
  geom_histogram()
`stat_bin()` using `bins = 30`. Pick better value with `binwidth`.

Building model

In R there are two fairly well-known libraries when it comes to model generation, caret and tidymodels. On one hand, caret is pretty simple to use, has lots of sources, guides, explanatory articles. On the other hand, tidymodels is an all-in-one solution but has less documentation, articles compared to caret.

Split train/test dataset

Our first step is to split our dataset on 2 parts. Each of those will be used for a different purpose. The first part’s (train dataset) purpose is to build our model. The other part (test dataset) will be used to evaluate our model’s performance.

Show the code
set.seed(123)
bank_dataset_split <- initial_split(bank_dataset,
                                prop = 0.75,
                                strata = y)

# Create training data
bank_train <- bank_dataset_split %>%
                    training()

# Create testing data
bank_test <- bank_dataset_split %>%
                    testing()
Show the code
head(bank_train) %>%
  kbl(toprule = T,align = 'c',booktabs = T)  %>%
  kable_styling(full_width = F, position = "center", html_font = "Cambria") 
ID age job marital education default balance housing loan contact day month duration campaign pdays previous poutcome y
1 30 unemployed married primary no 1787 no no cellular 19 oct 79 1 -1 0 unknown no
2 33 services married secondary no 4789 yes yes cellular 11 may 220 1 339 4 failure no
4 30 management married tertiary no 1476 yes yes unknown 3 jun 199 4 -1 0 unknown no
5 59 blue-collar married secondary no 0 yes no unknown 5 may 226 1 -1 0 unknown no
7 36 self-employed married tertiary no 307 yes no cellular 14 may 341 1 330 2 other no
8 39 technician married secondary no 147 yes no cellular 6 may 151 2 -1 0 unknown no
Show the code
head(bank_test) %>%
  kbl(toprule = T,align = 'c',booktabs = T)  %>%
  kable_styling(full_width = F, position = "center", html_font = "Cambria") 
ID age job marital education default balance housing loan contact day month duration campaign pdays previous poutcome y
3 35 management single tertiary no 1350 yes no cellular 16 apr 185 1 330 1 failure no
6 35 management single tertiary no 747 no no cellular 23 feb 141 2 176 3 failure no
15 31 blue-collar married secondary no 360 yes yes cellular 29 jan 89 1 241 1 failure no
23 44 services single secondary no 106 no no unknown 12 jun 109 2 -1 0 unknown no
51 45 blue-collar divorced primary no 844 no no unknown 5 jun 1018 3 -1 0 unknown yes
52 37 technician single secondary no 228 yes no cellular 20 aug 1740 2 -1 0 unknown no

Recipes

An important part in the process of model building is preprocessing. Depending of model type and data structure, I have to do the necessary changes. The tidymodels offers some ready-made preprocessing functions which make the whole process piece of cake.

In instance, the dataset I am working right now has imbalanced response variable (term deposit interest). For that reason, I used the recipe step_smote() from themis package.

Show the code
bank_recipe <- recipes::recipe(y~., 
                               data = bank_train) %>%
  step_rm(poutcome, ID) %>%
  step_corr(all_numeric(), threshold = 0.75) %>%
  step_dummy(all_nominal(), -all_outcomes()) %>% prep() %>%
  step_smote(y) %>%
  prep()

Let’s preview our dataset after applying our recipes :

Show the code
bank_recipe %>%
  prep() %>%
  juice() %>%
  head() %>%
  kbl() %>%
  kable_styling(full_width = F, position = "center", html_font = "Cambria") 
Table 1: Dataset after recipes
age balance day duration campaign pdays previous job_blue.collar job_entrepreneur job_housemaid job_management job_retired job_self.employed job_services job_student job_technician job_unemployed job_unknown marital_married marital_single education_secondary education_tertiary education_unknown default_yes housing_yes loan_yes contact_telephone contact_unknown month_aug month_dec month_feb month_jan month_jul month_jun month_mar month_may month_nov month_oct month_sep y
30 1787 19 79 1 -1 0 0 0 0 0 0 0 0 0 0 1 0 1 0 0 0 0 0 0 0 0 0 0 0 0 0 0 0 0 0 0 1 0 no
33 4789 11 220 1 339 4 0 0 0 0 0 0 1 0 0 0 0 1 0 1 0 0 0 1 1 0 0 0 0 0 0 0 0 0 1 0 0 0 no
30 1476 3 199 4 -1 0 0 0 0 1 0 0 0 0 0 0 0 1 0 0 1 0 0 1 1 0 1 0 0 0 0 0 1 0 0 0 0 0 no
59 0 5 226 1 -1 0 1 0 0 0 0 0 0 0 0 0 0 1 0 1 0 0 0 1 0 0 1 0 0 0 0 0 0 0 1 0 0 0 no
36 307 14 341 1 330 2 0 0 0 0 0 1 0 0 0 0 0 1 0 0 1 0 0 1 0 0 0 0 0 0 0 0 0 0 1 0 0 0 no
39 147 6 151 2 -1 0 0 0 0 0 0 0 0 0 1 0 0 1 0 1 0 0 0 1 0 0 0 0 0 0 0 0 0 0 1 0 0 0 no

Create validation set

So, how good is the model? Not so fast…

We could actually build the model and evaluate its performance. The problem with that approach is the sample.

Show the code
cv_folds <- recipes::bake(
  bank_recipe,
  new_data = bank_train) %>%
  rsample::vfold_cv(v = 5, strata = y)

Specify models

Next, parsnip helps us to specify our models. Initially, I will define a LightGBM model,

Show the code
lightgbm_model<- parsnip::boost_tree(
 mode = "classification",
 trees = 100,
 min_n = tune(),
 learn_rate = tune(),
 tree_depth = tune()) %>%
set_engine("lightgbm", loss_function = "squarederror")

and an XGBoost one.

Show the code
xgboost_model<- parsnip::boost_tree(
 mode = "classification",
 trees = 100,
 min_n = tune(),
 learn_rate = tune(),
 tree_depth = tune()) %>%
 set_engine("xgboost")

Hyperparameters tuning

Now, we are specifying the hyperpaterers’ values and a grid to check which combination of those are performing better according to our desired metric (in our case ROC). This has to be done for both, LightGBM

Show the code
lightgbm_params <- dials::parameters(
 min_n(),
 tree_depth(range = c(4,10)),
 learn_rate() # learning rate
)
Show the code
lightgbm_grid <- dials::grid_max_entropy(
 lightgbm_params,
 size = 10)

head(lightgbm_grid) %>%
  kbl(toprule = T,align = 'c',booktabs = T)  %>%
  kable_styling(full_width = F, position = "center", html_font = "Cambria") 
min_n tree_depth learn_rate
3 5 0.00
3 7 0.00
11 10 0.00
33 4 0.08
10 5 0.01
31 9 0.00

and XGBoost.

Show the code
xgboost_params <- dials::parameters(
 min_n(),
 tree_depth(range = c(4,10)),
 learn_rate() # learning rate
)
Show the code
xgboost_grid <- dials::grid_max_entropy(
  xgboost_params,
  size = 10
)

head(xgboost_grid) %>%
  kbl(toprule = T,align = 'c',booktabs = T)  %>%
  kable_styling(full_width = F, position = "center", html_font = "Cambria") 
min_n tree_depth learn_rate
5 6 0.00
4 8 0.00
37 9 0.00
2 5 0.00
21 9 0.01
21 5 0.05

Fit resamples

Show the code
# build workflow for LightGBM

lightgbm_workflow <- workflows::workflow() %>%
 add_model(lightgbm_model) %>%
 add_formula(y ~.)
Show the code
# build workflow for XGBoost

xgboost_workflow <- workflows::workflow() %>%
  add_model(xgboost_model) %>%
  add_formula(y~.)

Finally, we can build the LightGBM model by combining :

  • The workflows we set it up above
  • The resamples
  • Grid of values (hyperparameters)
  • Metric based on which we will evaluate our model’s performance
Show the code
start_time_lightgbm <- Sys.time()

lightgbm_tuned_model <- tune::tune_grid(
 object = lightgbm_workflow,
 resamples = cv_folds,
 metrics = metric_set(roc_auc, accuracy),
 grid = lightgbm_grid,
 control = tune::control_grid(verbose = FALSE) # set this to TRUE to see
 # in what step of the process you are. But that doesn't look that well in
 # a blog.
)

end_time_lightgbm <- Sys.time()

time_lightgbm = difftime(end_time_lightgbm,start_time_lightgbm,units = "secs")

Similarly, for XGBoost.

Show the code
start_time_xgboost <- Sys.time()

xgboost_tuned_model <- tune::tune_grid(
 object = xgboost_workflow,
 resamples = cv_folds,
 metrics = metric_set(roc_auc, accuracy),
 grid = xgboost_grid,
 control = tune::control_grid(verbose = FALSE) # set this to TRUE to see
 # in what step of the process you are. But that doesn't look that well in
 # a blog.
)

end_time_xgboost <- Sys.time()

time_xgboost= difftime(end_time_xgboost,start_time_xgboost,units = "secs")

Evaluate model

Our first results based on resamples for LightGBM

Show the code
lightgbm_tuned_model %>%
  show_best("roc_auc",n=5) %>% 
  kbl(toprule = T,align = 'c',booktabs = T)  %>%
  kable_styling(full_width = F, position = "center", html_font = "Cambria") 
min_n tree_depth learn_rate .metric .estimator mean n std_err .config
33 4 0.08 roc_auc binary 0.90 5 0.01 Preprocessor1_Model04
16 10 0.06 roc_auc binary 0.90 5 0.01 Preprocessor1_Model10
10 5 0.01 roc_auc binary 0.89 5 0.01 Preprocessor1_Model05
34 10 0.00 roc_auc binary 0.86 5 0.01 Preprocessor1_Model07
29 6 0.00 roc_auc binary 0.86 5 0.01 Preprocessor1_Model09

and XGBoost

Show the code
xgboost_tuned_model %>%
  show_best("roc_auc",n=5) %>% 
  kbl(toprule = T,align = 'c',booktabs = T)  %>%
  kable_styling(full_width = F, position = "center", html_font = "Cambria") 
min_n tree_depth learn_rate .metric .estimator mean n std_err .config
21 5 0.05 roc_auc binary 0.88 5 0.01 Preprocessor1_Model06
21 9 0.01 roc_auc binary 0.85 5 0.01 Preprocessor1_Model05
5 6 0.00 roc_auc binary 0.84 5 0.01 Preprocessor1_Model01
40 5 0.00 roc_auc binary 0.83 5 0.01 Preprocessor1_Model08
19 7 0.00 roc_auc binary 0.83 5 0.01 Preprocessor1_Model07

Last fit

By now we can assess which is the best combination of values. Given those I will assess my model’s performance on unknown (to my model) data. LightGBM model has 0.8469 ROC-value

Show the code
last_fit_lightgbm_model = parsnip::boost_tree(
 mode = "classification",
 trees = 100,
 min_n = 33,
 learn_rate = 0.0787,
 tree_depth = 4) %>%
set_engine("lightgbm", loss_function = "squarederror")
Show the code
options(digits = 4)

last_fit_workflow <- lightgbm_workflow %>% 
  update_model(last_fit_lightgbm_model)

last_lightgbm_fit <- 
  last_fit_workflow %>% 
  last_fit(bank_dataset_split)
! train/test split: preprocessor 1/1, model 1/1: NAs introduced by coercion
! train/test split: preprocessor 1/1, model 1/1 (predictions): NAs introduced by coercion
Show the code
last_lightgbm_fit %>% 
  collect_metrics() %>%
  kbl(toprule = T,align = 'c',booktabs = T)  %>%
  kable_styling(full_width = F, position = "center", html_font = "Cambria") 
.metric .estimator .estimate .config
accuracy binary 0.8833 Preprocessor1_Model1
roc_auc binary 0.8471 Preprocessor1_Model1

and XGBoost, 0.8736.

Show the code
last_fit_xgboost_model = parsnip::boost_tree(
 mode = "classification",
 trees = 100,
 min_n = 21,
 learn_rate = 0.0472,
 tree_depth = 5) %>%
set_engine("xgboost")
Show the code
options(digits = 4)

last_fit_xgboost_workflow <- xgboost_workflow %>% 
  update_model(last_fit_xgboost_model)

last_xgboost_fit <- 
  last_fit_xgboost_workflow %>% 
  last_fit(bank_dataset_split)

last_xgboost_fit %>% 
  collect_metrics() %>%
  kbl(toprule = T,align = 'c',booktabs = T)  %>%
  kable_styling(full_width = F, position = "center", html_font = "Cambria") 
.metric .estimator .estimate .config
accuracy binary 0.8921 Preprocessor1_Model1
roc_auc binary 0.8693 Preprocessor1_Model1

Results

It seems that my model has a really good predictive value even if I applied a relatively simple model. If an increased accuracy is justified we can apply a more powerful model (e.g., XGBoost, CatBoost, etc..).

To summarize,

Model Time to build ROC value (test) ROC value (CV)
LightGBM 24.19 sec. 0.8469 0.903
XGBoost 73.72 sec. 0.8736 0.881

In conclusion LightGBM model is less time consuming in comparison with XGBoost. On the other hand, XGBoost model needed more time to be built (which was expected) but outperformed LightGBM.

So, we got some results, so what? The main question is still unanswered. All this modelling was about to find out who is interested to a term deposit. Usually, I would use predict function with the corresponding data to mark my predictions. However, I wasn’t able to do that as I received an error about class. Nevermind, the function collect_predictions() does the same.

Show the code
pr = last_lightgbm_fit %>% collect_predictions()

Now, I will select the predicted value and the result and I will paste them on my test data.

Show the code
pr = pr %>% select(.pred_class, y) 

final = cbind(pr, bank_test)

And now let’s say that I want to give a list of only the interested ones. I will filter pred class to show only “Yes” values. We should also take into consideration that the dataset does not include any personal information, so I will also include an ID.

Show the code
final %>% 
  head() %>%
  kbl(toprule = T,align = 'c',booktabs = T)  %>%
  kable_styling(full_width = F, position = "center", html_font = "Cambria") 
.pred_class y ID age job marital education default balance housing loan contact day month duration campaign pdays previous poutcome y
no no 3 35 management single tertiary no 1350 yes no cellular 16 apr 185 1 330 1 failure no
no no 6 35 management single tertiary no 747 no no cellular 23 feb 141 2 176 3 failure no
no no 15 31 blue-collar married secondary no 360 yes yes cellular 29 jan 89 1 241 1 failure no
no no 23 44 services single secondary no 106 no no unknown 12 jun 109 2 -1 0 unknown no
no yes 51 45 blue-collar divorced primary no 844 no no unknown 5 jun 1018 3 -1 0 unknown yes
yes no 52 37 technician single secondary no 228 yes no cellular 20 aug 1740 2 -1 0 unknown no
Show the code
final %>% select(.pred_class, ID) %>%
  filter(.pred_class == "yes") %>% 
  kbl(toprule = T,align = 'c',booktabs = T)  %>%
  kable_styling(full_width = F, position = "center", html_font = "Cambria") %>%
  scroll_box(width = "100%", height = "200px")
.pred_class ID
yes 52
yes 99
yes 157
yes 201
yes 203
yes 219
yes 242
yes 299
yes 301
yes 355
yes 495
yes 685
yes 703
yes 806
yes 960
yes 1127
yes 1176
yes 1193
yes 1277
yes 1279
yes 1280
yes 1350
yes 1370
yes 1432
yes 1455
yes 1502
yes 1593
yes 1764
yes 1878
yes 1904
yes 1915
yes 1946
yes 1992
yes 2038
yes 2056
yes 2139
yes 2160
yes 2203
yes 2214
yes 2218
yes 2255
yes 2259
yes 2432
yes 2465
yes 2481
yes 2652
yes 2655
yes 2666
yes 2732
yes 2761
yes 2828
yes 2920
yes 3420
yes 3590
yes 3615
yes 3645
yes 3659
yes 3738
yes 3751
yes 3755
yes 3787
yes 3795
yes 3862
yes 3932
yes 3957
yes 3969
yes 4055
yes 4067
yes 4124
yes 4214
yes 4224
yes 4233
yes 4263
yes 4481
yes 4504

So, from 1131 possible clients, I finally got 75 that are actually interested. So, I reduced the required phone calls by 93 % (and therefore the working hours allocated to this task). But at what cost ?

Hypothesis

Let’s suppose we have to launch a new campaign and inform the interested parties. There are two options. The traditional one, in which case we should call everyone (1131 people). On the other hand, we can use a machine learning (ML) model (given that I have some data) to ‘interrupt’ some of them. I am also assuming that a phone call lasts, on average, 4 minutes. Additionally, based on Eurostat, the average hourly wage is 30.5 euros.

To call everyone, we would need 4,524 minutes, which corresponds to 75.4 working hours and therefore amounts to 2,300 euros. By using the model, we would only require 75 calls, equivalent to 5 working hours and 152.5 euros. Even in this simple example (with so few observations), we can see a significant benefit for the company. Last but not least, the company won’t disappoint any customers by promoting something they are not interested in, potentially losing clients. Therefore, ML modeling will help not only financially but also in maintaining a healthy brand.

Acknowledgements

Image by Gerd Altmann from Pixabay

References

Auguie, B. (2017). gridExtra: Miscellaneous functions for "grid" graphics. Retrieved from https://CRAN.R-project.org/package=gridExtra
Bray, A., Ismay, C., Chasnovski, E., Couch, S., Baumer, B., & Cetinkaya-Rundel, M. (2022). Infer: Tidy statistical inference. Retrieved from https://github.com/tidymodels/infer
Couch, S. P., Bray, A. P., Ismay, C., Chasnovski, E., Baumer, B. S., & Çetinkaya-Rundel, M. (2021). infer: An R package for tidyverse-friendly statistical inference. Journal of Open Source Software, 6(65), 3661. https://doi.org/10.21105/joss.03661
Dua, D., & Graff, C. (2017). UCI machine learning repository. University of California, Irvine, School of Information; Computer Sciences. Retrieved from http://archive.ics.uci.edu/ml
Falbel, D., Damiani, A., Hogervorst, R. M., Kuhn, M., & Couch, S. (2022). Bonsai: Model wrappers for tree-based models. Retrieved from https://bonsai.tidymodels.org/
Hvitfeldt, E. (2022). Themis: Extra recipes steps for dealing with unbalanced data. Retrieved from https://github.com/tidymodels/themis
Iannone, R. (2023). Fontawesome: Easily work with font awesome icons. Retrieved from https://github.com/rstudio/fontawesome
Kabacoff, R. (2019). Data visualization with r. URL Https://Rkabacoff. Github. Io/Datavis.
Kirenz, J. (2021). Classification with tidymodels, workflows and recipes. Retrieved November 22, 2022, from https://www.kirenz.com/post/2021-02-17-r-classification-tidymodels/#data-preparation
Kuhn, M. (2022a). Modeldata: Data sets useful for modeling examples. Retrieved from https://modeldata.tidymodels.org
Kuhn, M. (2022b). Tune: Tidy tuning tools. Retrieved from https://tune.tidymodels.org/
Kuhn, M., & Couch, S. (2022). Workflowsets: Create a collection of tidymodels workflows. Retrieved from https://github.com/tidymodels/workflowsets
Kuhn, M., & Frick, H. (2022). Dials: Tools for creating tuning parameter values. Retrieved from https://dials.tidymodels.org
Kuhn, M., & Vaughan, D. (2022). Parsnip: A common API to modeling and analysis functions. Retrieved from https://github.com/tidymodels/parsnip
Kuhn, M., Vaughan, D., & Hvitfeldt, E. (2022). Yardstick: Tidy characterizations of model performance. Retrieved from https://github.com/tidymodels/yardstick
Kuhn, M., & Wickham, H. (2020). Tidymodels: A collection of packages for modeling and machine learning using tidyverse principles. Retrieved from https://www.tidymodels.org
Kuhn, M., & Wickham, H. (2022a). Recipes: Preprocessing and feature engineering steps for modeling. Retrieved from https://github.com/tidymodels/recipes
Kuhn, M., & Wickham, H. (2022b). Tidymodels: Easily install and load the tidymodels packages. Retrieved from https://tidymodels.tidymodels.org
Moro, S., Cortez, P., & Rita, P. (2014). A data-driven approach to predict the success of bank telemarketing. Decision Support Systems, 62, 22–31.
Müller, K., & Wickham, H. (2023). Tibble: Simple data frames. Retrieved from https://tibble.tidyverse.org/
R Core Team. (2021). R: A language and environment for statistical computing. Vienna, Austria: R Foundation for Statistical Computing. Retrieved from https://www.R-project.org/
R-Bloggers. (2017). 5 ways to measure running time of r code. Retrieved November 20, 2022, from https://www.r-bloggers.com/2017/05/5-ways-to-measure-running-time-of-r-code/
R-Bloggers. (2020). How to use lightgbm with tidymodels. Retrieved November 20, 2022, from https://www.r-bloggers.com/2020/08/how-to-use-lightgbm-with-tidymodels/
Robinson, D., Hayes, A., & Couch, S. (2022). Broom: Convert statistical objects into tidy tibbles. Retrieved from https://broom.tidymodels.org/
Silge, J., Chow, F., Kuhn, M., & Wickham, H. (2022). Rsample: General resampling infrastructure. Retrieved from https://rsample.tidymodels.org
Vaughan, D., & Couch, S. (2022). Workflows: Modeling workflows. Retrieved from https://github.com/tidymodels/workflows
Wickham, H. (2016). ggplot2: Elegant graphics for data analysis. Springer-Verlag New York. Retrieved from https://ggplot2.tidyverse.org
Wickham, H. (2022). Forcats: Tools for working with categorical variables (factors). Retrieved from https://forcats.tidyverse.org/
Wickham, H., Chang, W., Henry, L., Pedersen, T. L., Takahashi, K., Wilke, C., … van den Brand, T. (2024). ggplot2: Create elegant data visualisations using the grammar of graphics. Retrieved from https://ggplot2.tidyverse.org
Wickham, H., François, R., Henry, L., Müller, K., & Vaughan, D. (2023). Dplyr: A grammar of data manipulation. Retrieved from https://dplyr.tidyverse.org
Wickham, H., & Girlich, M. (2022). Tidyr: Tidy messy data. Retrieved from https://tidyr.tidyverse.org
Wickham, H., & Henry, L. (2023). Purrr: Functional programming tools. Retrieved from https://purrr.tidyverse.org/
Wickham, H., Hester, J., & Bryan, J. (2022). Readr: Read rectangular text data. Retrieved from https://readr.tidyverse.org
Wickham, H., Pedersen, T. L., & Seidel, D. (2023). Scales: Scale functions for visualization. Retrieved from https://scales.r-lib.org
Wilke, C. O., & Wiernik, B. M. (2022). Ggtext: Improved text rendering support for ggplot2. Retrieved from https://wilkelab.org/ggtext/
Zhu, H. (2021). kableExtra: Construct complex table with kable and pipe syntax. Retrieved from http://haozhu233.github.io/kableExtra/

Citation

BibTeX citation:
@online{2022,
  author = {, stesiam},
  title = {Predict {Possible} {Interested} {Clients}},
  date = {2022-11-24},
  url = {https://stesiam.com/posts/2022-11-24-Predict-Possible-Clients/},
  langid = {en}
}
For attribution, please cite this work as:
stesiam. (2022, November 24). Predict Possible Interested Clients. Retrieved from https://stesiam.com/posts/2022-11-24-Predict-Possible-Clients/